Thursday, 30 January 2014
The importance of
auditing the Active Directory can be proved with a single fact that
doing this will help to maintain the security and integrity of the IT
infrastructure in an organization. However, auditing using the
traditional Windows native tools is a time consuming and difficult
process. It becomes more cumbersome when the auditor has to deal with
the difficult-to-understand event details.
Moreover, each domain has to be monitored separately and it increases the consumption of time and resources. Indeed, there should be a solution to centralize the auditing on all domains and that too in a user-friendly manner. With these features and much more, LepideAuditor for Active Directory (LAAD) comes up as a preferred solution to audit the AD. In this blog post, we’ll discuss how you can audit Active Directory objects using this tool.
Moreover, each domain has to be monitored separately and it increases the consumption of time and resources. Indeed, there should be a solution to centralize the auditing on all domains and that too in a user-friendly manner. With these features and much more, LepideAuditor for Active Directory (LAAD) comes up as a preferred solution to audit the AD. In this blog post, we’ll discuss how you can audit Active Directory objects using this tool.
Important Features
You can install the software on any
domain or even in a Workgroup computer and you’re free to add the
multiple domains (whether same or different) available in your
network.
In addition to auditing, this Lepide
product also creates the snapshots of the states of the objects
periodically, which can be used to reinstate the previous working
states of the AD objects.
Adding a Domain
The first step is to add a domain in
LepideAuditor for Active Directory. For adding a domain, go the
“Settings” tab and click “Domain Management” button in the
Left Hand Section. Click on the “Add” button for adding a domain,
of which auditing you’ve to conduct. This will display the
following dialog box

Provide the necessary inputs like
Domain Name/IP Address of the domain, Username, and Password. You can
also click on the “Discover Domain” button to list all the
domains and select anyone of them. It is required to provide the
credentials for an Administrator. Usage of agent is optional, still
it’s required to collect the data in a better manner. Click “OK”
button once you’re done. In the Dashboard, a tab will be created
for each added domain.
Collection Management
Click “Change Collection Management”
option in the Left Hand Panel. This will display the window
containing the options, which’re displayed in the following image.

Here, you can modify the time interval
after which the software should collect the data from the added
domain(s) automatically. You can also specify the duration after
which a snapshot of the states of the Active Directory objects will
be created.
Email Management
Switch to the “Email Management”
option to add your email server using which the software will email
the scheduled reports and real-time alerts to the intended
recipients. Click on the “Add” button located in the Right Hand
Panel and this will display the following dialog box.

Here, you’ve to provide the details
like Login name (email ID), password, SMTP Server Name (Outgoing
server), SMTP server port, your email address, and Display name. If
your account uses SSL connection then check “Requires a secure
connection (SSL)”. Click “Send Test Mail” to check the Settings
by sending a test email to any recipient. Click “OK” button once
the settings are validated to save the email server.
Dashboard
Now, switch to the first “Dashboard”
tab. This will have separate tabs for each domain. Its upper part
will display the graphs on four major operations. Scroll down to the
“Data Collection Update” section containing different panes for
“Change Capture Current Status” and “Backup Capture Current
Status”.

You can click “Collect
Data Now” and “Collect Snapshot Now” at any moment to collect
the Active Directory logs and snapshot manually at any moment. Please
note that the software will automatically collect the data and
snapshot for very first time just after adding the domain.
Reports
It’s the time to switch to “Reports”
tab to check the predefined Active Directory Change and Active
Directory State Reports. The former kinds of reports are based on the
collected data to display both the previous- & after-change
values of every object. On the contrary, the software generates the
AD State Reports after comparing two snapshots containing different
states of the objects.

Expand the parent node displayed with
the IP Address or the domain name. This will show the following tree
structure.

Expand any category to access its
reports. For example, expanding DS Access Reports will display the
following nodes.

Double click any node to access its
report in the Right Panel. If the report isn’t generated
automatically, then you can click the “Generate Report” button in
the Right Panel. For example, the “Recently Created Objects”
report will be displayed as below.

Let us have a look at all the options
available to you in this Right Panel:
- Start Date and End Date: You can select the period for which the auditing data has to be displayed.
- Generate Report: Click this button if the report isn’t generated automatically. You can even click it to refresh the report to reflect the newly collected changes.
- Hide Graph: Click this button to hide the interactive graph.
- Sorting: You can click any column heading to sort the report as per that column in the ascending or descending order.
- Searching: In the first blank
row, you can provide the text keyword for which you want to search
the report in any column. For example, searching for “contact” in
the “Class” column will display the following result.
In addition to this, you can click
 button to search the complete report for any text keyword.
Clicking this will display the following dialog box.Enter any keyword in the textbox and click “Find Next” button. This will highlight the rows one by one containing that particular keyword.
- Group by: Select any column
heading and drag it to the light blue area saying “Drag a column
header here…” This will group by the report according to that
column. For example, grouping the report by “Class” column will
display the following result.
Drag the grouped-by column back to the report at the same place to get back the earlier report.

- Filtration:Click
 button to display the following dialog box.
Click on the “Set Filter” link for any column to apply a filter to it with the following dialog box.
button to display the following dialog box.
Click on the “Set Filter” link for any column to apply a filter to it with the following dialog box.
You can also click button with any column heading in the report to access the same box for that particular column. Please note “Clear Filter” will remove the applied filter on the report.
Click the “Filter Selection” drop down menu to access its options “All but excluding selected” and “Selected Only”. Select any one of them to display the values based upon which a filter can be applied. Click “OK” button to apply the filter.
button with any column heading in the report to access the same box for that particular column. Please note “Clear Filter” will remove the applied filter on the report.
Click the “Filter Selection” drop down menu to access its options “All but excluding selected” and “Selected Only”. Select any one of them to display the values based upon which a filter can be applied. Click “OK” button to apply the filter.
-
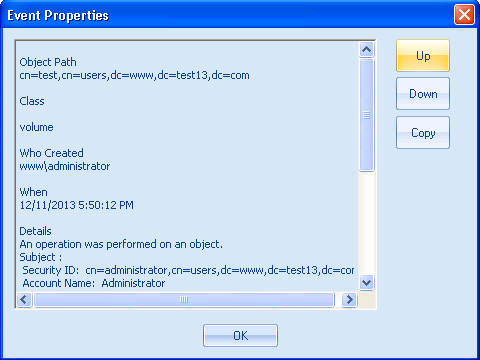
Viewing Details: Double click any row to view the complete details of the selected event.You can click Up and Down buttons to navigate through the details of each captured event. Click “Copy” button to copy the details to the clipboard.
- Saving the
Report:Click
 (save) button to save the default or customized report on the disk as a CSV, MHT or PDF file. Saving the report in the shared location will share it with other users as well.
Scheduling the Report
Right click on any report in the Left
Hand Panel and select “Schedule Report”. You just have to follow
the easy-to-understand onscreen instructions of the wizard to create
a scheduled task. “Schedule Reports” tab will have the list of
all scheduled reports along with their delivery status reports.
Creating an alert
Right click on any report in the Left
Hand Panel and select “Set Alert” option. You’ve to follow the
onscreen instructions of the wizard to create an alert. You can use
“Alerts” tab to manage the created alerts and to view their
delivery status reports. As soon as the software identifies the
predefined condition in any of the created alerts, a short email
summarizing the event will be sent to the defined recipients
immediately. This will help the administrators to encounter the
erroneous and critical situations without wasting much time.
Conclusion
LepideAuditor for Active Directory is,
in fact, a great tool to audit the Active Directory objects in a much
friendly way than the native tools. Following the above steps will
help an auditor to effectively audit an AD environment and help the
administrators to keep an eye on their infrastructure. You can get more information from here..http://www.lepide.com/active-directory-audit/
Subscribe to:
Post Comments (Atom)
CONTACT US FOR TECHNICAL SUPPORT

Popular Posts
-
 The importance of auditing the Active Directory can be proved with a single fact that doing this will help to maintain th...
 -
Are you sleep deprived because of your Active Directory? If yes, then you can easily understand the reason behind it. Active Directory is...
-
Users logging on or off into their domain computers is a very routine activity that occurs in any enterprise. However, just like any other ...
-
 Active Directory (AD) delegation is certainly one of the most critical aspects of any organizations' IT infrastructure. By delegating ...
 -
 All objects in Active Directory (e.g., users, groups, OUs and group policy objects) are structured as per the AD’s schema of object classe...
0 comments:
Post a Comment